Holding an ocarina on the high notes
Holding an ocarina on the high notes is pretty easy as long as you understand the instrument's natural balance. First, ocarinas are designed to balance between the right thumb and pinky finger, called the primary balance plane.
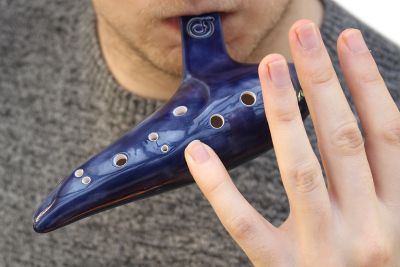
Try holding your ocarina as shown, resting it on the right thumb with your pinky finger on the ocarina's tail to the right of the finger hole. It should balance when the mouthpiece is about parallel to the ground.


The secondary plane runs between the left pinky hole and the mouthpiece. Note that this plane can only be used when the pinky hole is placed vertically on the side of the instrument.

We make use of these balance planes to play the high notes easily, and their function says a great deal about the quality of an ocarina.
Any ocarina that falls away from you when you try to balance it on the primary plane will be exceptionally difficult to play, and in my opinion is defective. More fingers will need to support the instrument, preventing them from easily fingering notes.
It is not a problem if the ocarina has a tendency to roll towards the mouthpiece as it puts the weight of the instrument on your lips, and makes it feel more stable.
Balancing an ocarina on the high notes
When we play the high notes, we make use of these balance planes to support the instrument. First, we can place the right pinky finger on the ocarina's tail next to the finger hole. I'd suggest doing this when playing G and higher notes, assuming C ocarina fingerings.
You may find it useful to practice moving the pinky between its finger hole and the tail.


With this finger in place you can play up to the high D using no additional support fingers. The ocarina balances on its primary plane, with supplemental support from the pinky.

Playing high E
To play the high E and F, we need one more support point, achieved by pressing the left index finger vertically against the ocarina's cappello:


To be effective, the index finger must be quite vertical, and to see why, try holding the ocarina as shown, right thumb lifted from its hole and left index finger flat on top of the cappello. If you then lower the left thumb, the ocarina will fall downwards onto the thumb.
If you instead orient the left hand and index finger vertically, you'll notice that the finger pushes the instrument towards your lips and grips against the instrument to provide support.


Both the left index finger and right pinky need to push towards the instrument somewhat to effectively support it, and the coordination of pressure between these fingers is important. Note that:
- Applying pressure to the right pinky will cause the ocarina to rotate right.
- Inversely, applying pressure to the left index finger will cause the ocarina to rotate towards the left.
You'll find a balance where the ocarina feels secure, and with that support in place, we can play the high E by rolling the right thumb off the hole.


To roll the thumb:
- When the right thumb hole is closed, the right thumb covers the hole towards the tip, with the finger slightly bent at the last joint (shown in the following video).
- To open the hole, straighten the thumb and rotate your right hand forwards from the wrist. The thumb will roll off the hole—see the video below.
- If you have hitchhikers thumbs, most of the movement can be attained by bending the thumb backwards.
Note that if your ocarina has functional secondary balance, you can play up to E using the support provided by the left pinky alone. Adding the left index finger on the cappello as well helps to stabilise the instrument, and is required to play the high F.
Playing high F
From here, the ocarina is supported by the left index, right thumb, and right pinky. You can safely remove the left pinky to play the high F. I recommend practising this by playing the four highest notes in a loop: C, D, E, F, E, D.
Other things to note
Italian fingering
What has been described so far is for an ocarina with Asian fingering. For instruments with Italian fingering the technique is the same but the E is played on the pinky and F on the thumb. Such ocarinas allow you to play one more note without moving the thumb.
When to place the index finger on the cappello
As long as your ocarina has a functional secondary balance, the left pinky on the finger hole provides enough support to play up to E without using the cappello. However, it is good practice to use the cappello when you switch between high C and D and have the support in place in advance. Aim to move both fingers at the same time as shown in the video below.
Sliding onto the cappello to play leaps
When moving from notes below high C, you have to slide the left index finger onto the cappello. The finger is straightened and slid sideways at the same time, ending up with the second or third joint from the tip resting against the ocarina's body.
Note that sliding movements are much easier to do on unglazed ocarinas, and putting a bit of chalk dust or talk on your finger can be helpful.
Leaping between the high and low notes
A similar sliding technique can be used to leap between the highest and lowest notes. For instance, to leap directly from low C to high F:
- Straighten the left index finger and slide it onto the cappello.
- At the same time, slide the pinky finger on to the tail, lift all of the other fingers and roll off the right thumb.
Making wide leaps also requires a large change in breath pressure. I recommend practising with a tuner until you get used to it.
The palm grip
The three point grip discussed previously is advantageous in that it keeps the fingers close to their respective holes at all times and distributes the weight of the instrument across both hands. However, it can be limiting in case the right thumb hole needs to be trilled or otherwise played very fast.
The palm grip is another way of playing the high notes which addresses those issues. It is done by wrapping the right ring and pinky finger around the tail and holding the ocarina against the palm. This way, the entire weight of the ocarina is taken by the right hand, which allows the right thumb to be removed.
Note that the remaining two fingers have a tendency to extend vertically upwards. I strongly recommend keeping them bent so they remain close to their holes and have less distance to move when returning to a lower note.


The ergonomics of this technique means that the right hand fingers need to be in place before the right thumb can be moved. This effectively splits the range of the ocarina into an 'upper' and a 'lower' register, with some notes impossible to leap between.
For example, if you are playing a series of low notes followed by high notes, you need to find a position in the music that allows you to change grip, without the locking of the right hand making it impossible to play following notes. Forward planning is essential.
To summarise, these are the downsides I see with this technique:
- It locks most of the right hand fingers a long way from their holes.
- As the palm grip places the entire weight of the ocarina onto the right pinky and index finger, it does not work with large heavy bass and contrabass ocarinas.
- The amount of time it takes to switch into and out of effectively splits the ocarina's range into an upper and a lower register. Using it requires forward planning, and it is basically impossible to leap directly between the high and low notes with this technique.
- The technique only works well with ocarinas that were designed with an elongated tail.
- It is very difficult to use on rounded ocarinas as there is nothing to grip.
Because of these problems, I only recommend using this as a supplement rather than a primary technique. If you do use this technique, be especially careful not to shade the right pinky hole, as doing so will flatten the high note and may cause screeching.
Better options?
On most wind instruments, the right thumb is used exclusively to support the instrument and, after playing the ocarina, you will really appreciate the value of this.
There are a few ways of allowing the right thumb to just support the instrument, the most straightforward being to play a multichamber ocarina. As they play higher notes by using higher pitched chambers and only one is played at a time, most multichambers do not have a right thumb hole.
Other possibilities include changing the fingering system, externally supporting the instrument, or replacing the function of the right thumb hole with a key.
Changing the fingering system is an interesting option, as the right thumb hole can be eliminated by making only a minor change. If the left middle finger hole is enlarged to sound three semitones, the other notes can be moved to different fingers:
- The left thumb hole moves to the left index finger.
- The right thumb hole to the left thumb,
- and the pinky hole remains the same as in 'Asian' fingering.


As can be seen in the following fingering chart, this causes only a minor change from standard fingering. On the ocarina I made to test the idea, 'B' can be played using the 'B flat' fingering, and B flat by closing the right index finger hole as well. All other accidentals remain available, and most of them can be played with the usual fingerings.

Another option is to keep the thumb hole, and support the instrument differently, such as by adding pieces which rest between the bases of the fingers, or mounting the instrument to the player's wrist.
Further exploration of these ideas can be found in the blog post Eliminating the dual function of the ocarina's right thumb hole.

