How to hold an ocarina
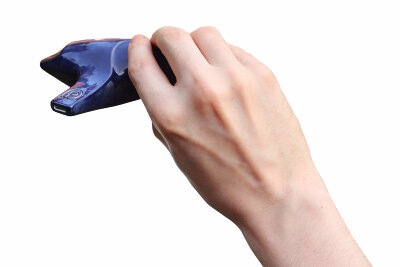
You hold an ocarina with your hands approaching the instrument from opposite directions. The left hand is positioned with the palm facing towards you, and the right palm faces away from you.


Ocarinas have one hole for every finger and both thumbs, labelled in the diagram below. There is also a third hole on the bottom called the voicing; this is where the sound is produced, and this hole is never covered while playing.
Multichambered ocarinas are held in the same way, but the right hand is responsible for the holes of several chambers. Additional details can be found in the article Holding a multichamber ocarina.

Right hand position
The right hand approaches the ocarina with the mouthpiece facing towards you. The four fingers cover the four holes on top, and the right thumb covers the large hole on the bottom right of the ocarina, the thumb hole closest to the tail.
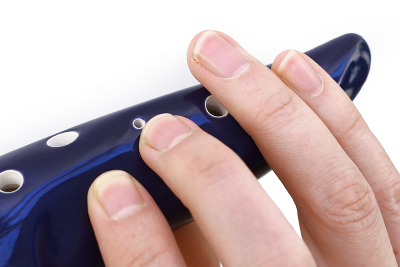
- All holes should be covered using the pads of the fingers, the large flat area opposite the finger nail, never the fingertips.
- Notice that you can feel the edge of the finger holes under your fingers. Use this feeling to position the fingers over the centre of the holes.
- The thumb should rest at a slight angle, so the thumbnail is closer to the ocarina on the side of the thumb closest to the voicing.


And the overall position of your right hand should be similar to shown below. The thumb in particular should be held straight and as horizontal as possible, as it supports most of the instrument's weight.

Looking towards the back of the hand, try to adjust so that the hand is slanted towards the left as shown. You may find it easier to reach the pinky hole by overhanging the ring finger a little, I have positioned my finger next to the hole to show the overhang.
If you hold the ocarina lightly and check your finger positions using an eye level mirror, all of your fingers should be roughly parallel and have a gradual curve along their length, with no discomfort in your hands.


Should you find that your hands resemble the following picture, with fingers being sharply bent and resting at odd angles, try to adjust your hand to reduce this.

First, you could just be holding the instrument too tightly.
Give this a try:
- Hold it very loosely, and notice how it wobbles and feels unstable.
- Hold it very tightly, and notice how your fingertips turn white.
Aim to find a happy medium, where the instrument is steady without needless hand tension.
You may find yourself holding the instrument extremely tightly out of a fear of dropping it, but there's really no need to. Ocarinas are designed to balance between the right thumb and pinky finger when held parallel to the ground.
Second, you may be folding the right thumb backwards
If you can bend your thumbs backwards (hitchhiker's thumb), care needs to be taken, as doing this will cause issues with the placement of the other four fingers. Having the thumb in that position also provides poor support for the ocarina and may cause joint pain.
If you find yourself doing that, just pay attention to your thumb while playing and hold the joint straight. It will become automatic after a few days.
Used effectively, the ability to bend your thumb back makes it easier to play the high notes, addressed in Holding an ocarina on the high notes.


Finally, the ocarina may be a poor match for your hands
As everyone's hands are different, it is impossible to design a single ocarina that perfectly fits the hands of all players. If you suspect that this could be a problem, I'd recommend trying other ocarinas.
It is sometimes possible to compensate by adjusting the angle of your hands and allowing fingers to overhang the holes. This is addressed at the end of the article.
Left hand position
The positioning of the left hand is similar to that of the right hand, but rotated 180 degrees. It comes towards the ocarina with your palm facing towards you.
Like with the right hand, your fingers should be gently curved along their length. I strongly recommend using a mirror to check the position of your left hand, as it is near impossible to see otherwise.


Many ocarinas are designed with the pinky hole positioned on the side of the instrument and the instrument balanced between the pinky hole and mouthpiece, as it allows the pinky finger to provide additional support.
To make use of this, the left palm must be in a relatively vertical position, like this:

On such instruments, the left pinky finger should rest at an approximate 45-degree angle relative to the ocarina, allowing it to brace against the instrument and provide an extra support point while playing the high notes.
It is common for the left thumb hole to be positioned flat on the bottom of the instrument, in which case, keeping the hand vertical requires the left thumb hole be covered with the tip of the thumb.
There is an ergonomic benefit to angling the left thumb hole similar to the thumb key on a flute, which allows the hole to be covered with the pad of the thumb while the palm is vertical.


Vertically orienting the left hand also keeps the left index finger close to the instrument, allowing it to help with supporting the ocarina on the high notes. This technique is described in more detail on the page 'How to play the high notes of single chambered ocarinas'.

General posture
Stand or sit straight, turn your head slightly to the left, and bring the ocarina up to normal playing position. Aim to keep the ocarina parallel to the ground, as this keeps its weight on the right thumb.
Try to position your elbows so that the wrists lie neutrally, neither folded forwards nor kinked back, as that may cause wrist pain. For most, this will mean the arms will rest with the elbows down and slightly away from the torso.
Note that when your wrists are straight with the arms and viewed in a mirror, the wrists will appear bent slightly backwards as in the first picture due to the shape of the hand.
While playing any wind instrument, it is important to sit or stand straight, as it increases the volume of your chest and allows you to play longer between breaths. Give it a try, breathe in as much as you can while slouched, then straighten up, and try to inhale.
Maintaining a straight posture is easiest to do while standing, but If you do have to sit, it's best to sit on a rolled up towel or the edge of a chair. This allows the pelvis to tilt forwards and the chest to open.
Maintaining a good posture requires regular deliberate corrections at first, but it does become automatic over time. See 'Blowing an ocarina correctly' for more.
Subholes and split holes
Subholes and split holes both require you to cover two holes with a single finger.
- A subhole is a small hole which may be covered by sliding a finger forwards, covering two holes at once. They are used to play notes below the tonic.
- A split hole is when a single hole has been split into two smaller holes to make a sharp or flat easier to play.
In both cases, if you draw an imaginary line between the two holes, it is important to angle your finger to align with that.
Positioning fingers for subholes
When the subhole is open, the finger should rest with a subtle curve along its length, as shown in the left hand picture following. From this position, it is easy to cover the subhole by straightening the finger, as in the right picture.


Positioning pinky finger on split holes
On some ocarinas, the right pinky hole is split in two. This is done both to improve the tuning of the low sharp and to make the note easier to play, especially with a 10 hole ocarina. Notice that the angle of my finger aligns roughly with the angle of the holes.
I find it best to play these by moving the base of the finger by curling the palm, as can be seen here if you look at the knuckles. Palm curl is discussed later in the article.


The angle of your hand relative to the ocarina has a big impact on the angle of the fingers. I find it easiest to cover split holes when the hand is at an angle to the ocarina, as in the first image. Having it too vertical can cause problems, but this will depend on your hands.


Adjusting your hands to eliminate soreness
It is normal while playing a new instrument to experience some amount of soreness as you are asking your body to do something different. Normally, this will go away after a day or two, but if it doesn't, it may be due to your posture.
Human hands are immensely versatile, but that same versatility means it's easy to make awkward compensations without your awareness, leading to soreness when playing the ocarina.
Let's walk through all of the ways that the hand can move and observe how they impact your hand's relationship with the ocarina.
The rotation of the forearm
Try rotating your forearm while holding an ocarina, and you'll notice that it influences how the fingers relate to the instrument, causing different parts of the pads of the fingers to cover the holes. At extremes, it forces fingers to lie at odd angles relative to each other.
Try to find a rotation that lets your fingers lie parallel, with a gentle curve along them.


The fold of the wrist
How much you fold your wrist changes which part of the finger pad covers the holes. Pivoting the wrist down too much can make it impossible to cover the top holes with the pads of the fingers.


The pivot of the wrist
Wrist pivot has a similar effect to forearm rotation, pivoting to the left causes the left fingers to curl more. Pivoting to the right does the opposite.
Aim to find a position that allows all fingers to have a similar curl. It is fine for the pinky to be straight, as it is so much shorter than the other fingers.


The curl of the palm
The palm isn't an immobile slab, it can curl across its width, varying between flat along the tops of the knuckles to visually curled. This movement is quite subtle, and has proved difficult to show clearly in photographs.
Palm curl has a big impact on the positioning of the tips of the fingers relative to each other, and may be worth experimenting with if you are having difficulty reaching the holes.
Curling the palm is also useful for playing ocarinas with split holes, as the palm can be curled and uncurled to slide the finger forwards and back. I find this easier than curling the finger.


How the fingers are curled
You can vary how the fingers are bent along their length, either keeping them straight and bending from the knuckle, to having them curved gently, to having almost all of the bend in the last joint of the finger.
Generally, you want to find a middle ground here, but going to one or other extreme may be needed depending on the design of the ocarina and the relative lengths of your fingers.


Finger overhang
One of the reasons we cover the holes using the pads of the fingers is that they are large. You can cover the hole close to the fingertips, or much further back closer to the joint, with a significant finger overhang.
Deliberately overhanging fingers can help a lot with hand posture, and as noted earlier in the page, I usually overhang my right ring finger quite a lot.
Just take care not to unintentionally cover subholes if applicable. 10 hole ocarinas are in theory better able to adapt to differences in players' hands, as fingers can be overhung arbitrarily due to the lack of subholes.


Closing
By experimenting with the things noted here, it should be possible to find a posture that is comfortable for you. If you cannot find a comfortable position, do try ocarinas made by other makers, as hole positioning varies a lot.
Also, keep coming back to your hold and refining it as you get more experience. Your point of view will evolve over time.
